|
|
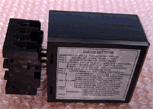
 Loop Detector Loop Detector |
|
|
|
|
|
|
|
|
Ultrasonic Radar |
|
|
|
|
|
| |
Microwave Sensor |
|
|
|
|
| |
Safety Beam Sensor |
|
|
|
|
|
|
|
|
|
|
|
|
|
|
Optical Beam Sensor |
| |
|
| |
Door Switches |
|
|
|
|
| |
Automatic Barriers |
|
|
|
|
GSM Remote Opener |
|
|
|
|
 |
LD160 1-Channel Vehicle Loop Detector |
| Installation and Diagnoses: |
|
|
 •
1 . Power Supply:220V/110V/24V/12V •
1 . Power Supply:220V/110V/24V/12V
• 2 . Current: 50mA
• 3 . Detect time: <15ms
• Sensitivity: Sixteen
levels(SW1set)
• Output: Relay A and B, relay capacity
is 220VAC/3A, 110VAC/3A, 24VDC/10A
• Option: Refer to
SW2
• Indicator: One red LED indicator for power and
one green LED indicator for channel detection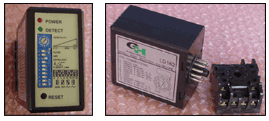
• Dimension: L76W42H74mm
• Weight: 300g
•
Connector: PF113A
• Frequency: 20-80KHz +
•
Operation: Temperature -40~85 ℃
Humidity 5%~95%
• Storage:
Temperature -55~125 ℃
Humidity 5%~95%
|
| |
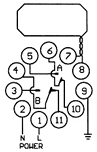
| Connectors: Please refer to the input
power, loop connectors and output connectors |
|
 |
| |
Type |
| Pin |
LD161 |
LD162 |
LD163 |
LD164 |
| 1 |
110 V |
220 V |
12 V |
24 V |
| 2 |
110 V |
220 V |
12 V |
24 V |
| 3 |
N.O. of Relay B |
| 4 |
COM. of Relay B |
| 5 |
NO. of Relay A |
| 6 |
COM. of Relay A |
| 7 |
Loop |
| 8 |
Loop |
| 9 |
Ground |
| 10 |
N.C. of Relay A |
| 11 |
N.C. of Relay B |
|
|
| |
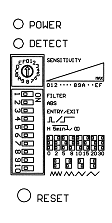
| Operation Panel and Switches:
|
|
• 1. PO WER: Red LED Indicator. If it
is in full lit, power is supplied.
|
| • 2. DETECT: Green LED Indicator. If it
is in full lit, a vehicle is detected. If it is blink, the
loop is wrong. |
| • 3.SW1(SENSITIVITY): Sensitivity
Selection. Used to select the sensitivity, select from0 to
9,A~F, 0 means the lowest sensitivity and F means the
highest sensitivity. |
|
| Sensitivity(-ΔL/L ×
100) % |
| Pos. 0 |
2.56 |
Pos. 4 |
0.48 |
Pos. 8 |
0.12 |
Pos. C |
0.030 |
| Pos. 1 |
1.28 |
Pos. 5 |
0.32 |
Pos. 9 |
0.08 |
Pos. D |
0.020 |
| Pos. 2 |
0.96 |
Pos. 6 |
0.24 |
Pos. A |
0.06 |
Pos. E |
0.015 |
| Pos. 3 |
0.64 |
Pos. 7 |
0.16 |
Pos. B |
0.04 |
Pos. F |
0.010 |
|
|  |
|
• 4. SW2(DIP SWITCH):
(1). DIP 1 & DIP 2: Special Functions
| DIP NO. | DIP MODE |
Functions |
| DIP 1 | □■ ON |
Output has 2 seconds delay. (no relay output if the vehicle
speed is over 8km/h) |
| DIP 2 | □■ ON |
Increase sensitivity to avoid unwilling relay OFF for
leaving vehicle especially for trailer |
(2). DIP 3 & DIP 4: Relay B output types
| DIP NO. |
DIP 3 |
DIP 4 |
Relay B Output Type |
Vehicle Present  |
| DIP MODE |
OFF ■□ |
OFF ■□ |
When vehicle going into, Relay B is in pulse output for 200ms. |
Relay B Output  |
| DIP MODE |
□■ ON |
OFF ■□ |
When vehicle left loop. Relay B will delay 200ms and give a
pulse output for 600ms. |
Relay B Output  |
| DIP MODE |
OFF ■□ |
□■ ON |
Relay B will be present output. No reaction on DIP3. |
Relay B Output  |
| DIP MODE |
□■ ON |
□■ ON |
When loop is in fault, Relay B will be ON and will be OFF after
fault is solved |
(3). DIP 5: Automatic Reset
| DIP NO. |
DIP 5 |
Present Mode |
| DIP MODE |
□■ ON |
Vehicle can be permanent present. (no auto-reset, unless
vehicle left or manual reset |
| DIP MODE |
OFF ■□ |
Normal mode. (automatic reset after 10 minutes present of
vehicle, used to solve the mistake operation. It is recommended) |
(4). DIP 6 & DIP 7 & DIP 8: Relay A Delay
(5). DIP 9 & DIP 10: Frequency (30K~100KHZ). Used to avoid the
interference
| DIP NO. |
DIP 9 |
DIP 10 |
Frequency |
| DIP MODE |
OFF ■□ |
OFF ■□ |
High(Hi) |
| DIP MODE |
□■ ON |
OFF ■□ |
Medium-High(Med-Hi) |
| DIP MODE |
OFF ■□ |
□■ ON |
Medium-Low(Med-Low) |
| DIP MODE |
□■ ON |
□■ ON |
Low(Low) |
In the application of many loops which are nearby, the frequency may
require be changed to avoid interference.
• 5.RESET Button: Press the RESET button will reset the
detector. Reset is normally used after any DIP change and
installation. |
| |
| Installation and Diagnoses: |
|
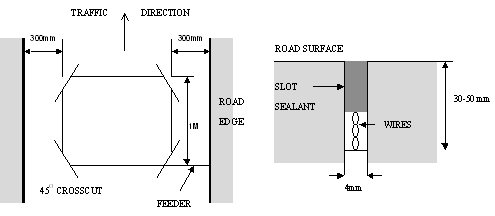 |
• 1. Please refer the upside diagrams for loop
size and installation.
• 2. We recommend to use 0.75mm2
multi-core copper wire. The total wire length include feeder can
be up to 500m.
• 3. The loop should be rectangular and avoid
any right angle. The recommended length is from 1.0m-2.0m, the
recommended width is from 0.8m-1.2m.
• 4.The perimeter and
turns:
| Perimeter |
No. of Turns |
| 3 - 4 m |
6 |
| 4 - 6 M |
5 |
| 6 - 10 m |
4 |
| 10 - 20 m |
3 |
| 20 m - up |
2 |
• 5.The feeder must be twisted once per 15mm.
• 6.More
turns, lower frequency. Less turns, higher frequency.
•
7.Place the loop away from the moving metal.
• 8.Any vehicle
can be detected, when the speed is less than 160km/h
•
9.Relay capacity, 220VAC/3A, 110VAC/3A, 24VDC/10A.
• 10.If
the detector is not working, please check as following
a、 Press RESET.
b、 If red LED indicator is not in full lit, please check
power supplier.
c、 If green LED indicator blink, it may be: loop is short
cut or no. of turns is not enough(blink slowly); Loop is open or
no. of turns is too many(blink fast).
d、 No. of turns is not enough: change the frequency to
lower. If frequency is still too high, you must add more turns.
e、 No. of turns is too many: change the frequency to
higher. If frequency is still too low, you must leave some
turns. |
| | | |